
The Theory
Notes are named after the first seven letters in the alphabet. In order, they are:
A – B – C – D – E – F – G
These are considered the natural notes.
The symbol for natural looks like this:
♮ = natural sign
You won’t see this symbol show up much at first. When talking about natural notes the symbol is understood rather than written most of the time. For our purposes here A = A♮, B = B♮ and so on.
Now, between any two natural notes, except B – C and E – F, we also have a sharp/flat note.
These are the symbols that are used to denote sharp and flat:
♯ = sharp sign
♭ = flat sign
If we list the notes again and include the sharp/flat notes, we get:
A – A♯/B♭ – B – C – C♯/D♭ – D – D♯/E♭ – E – F – F♯/G♭ – G – G♯/A♭ – A
One important thing to notice is that X♯/X♭ is one note that has two names (The term for this is ENHARMONIC). For example, A♯ is the exact same note as B♭. Sometimes, one name will be used, and sometimes the other name will be used. We will cover this in much greater detail in a later lesson. For now, it’s only important that you know the names of the notes.
Another thing to notice is that after G♯/A♭We arrive at A again. This second A vibrates exactly twice as fast as the first A, and therefore, the ear tends to hear it as another version of the same note (The term for this is OCTAVE). The second A is said to be an octave higher than the first A. If we continue after the second A, we get A♯/B♭ an octave higher, B an octave higher, C an octave higher etc., etc., until we get to A again. This A is two octaves higher than the first A. If we keep going, the whole pattern just repeats over and over until we can’t get any higher on the instrument. (If you didn’t run out of notes, you could keep right on going until the notes were so high that only a dog could hear them!) The same is true if you travel in the opposite direction. The pattern repeats until you run out of notes, or the neighbors call the cops (whichever comes first).
For practical purposes you don’t have to say octave when you’re naming the notes. An A is an A is an A as far as we’re concerned right now. You’ll run into the term here and there when talking about music though.
Here’s something to help you remember the sharps and flats. If you sharpen a pencil, you raise a point on it. Likewise, if you play A and then play the next higher note, you would call the second note A♯. If you flatten a beer can, you mash it down. Likewise, if you play B and then play the next lower note, you would call the second note B♭. Remember that A♯ and B♭ are the exact same note or enharmonic.
This may be a bit confusing, but you’ll get used to it.
All you have to remember is A through G of the alphabet are the natural notes and a ♯/♭ note lies between every two notes except B – C and E – F. For now there’s no such note as B♯ or C♭, likewise, there’s no E♯ or F♭. (There is exception to this but, that’s down the road a bit.)
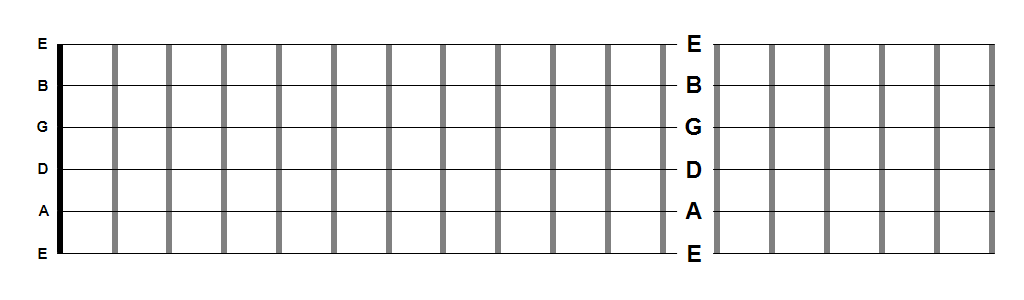
The Fingerboard
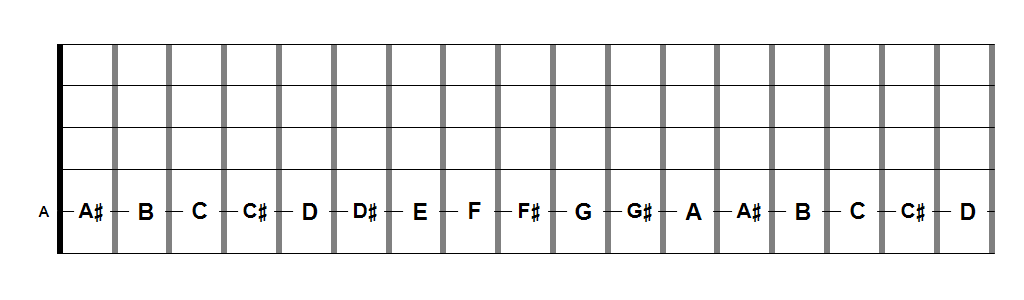
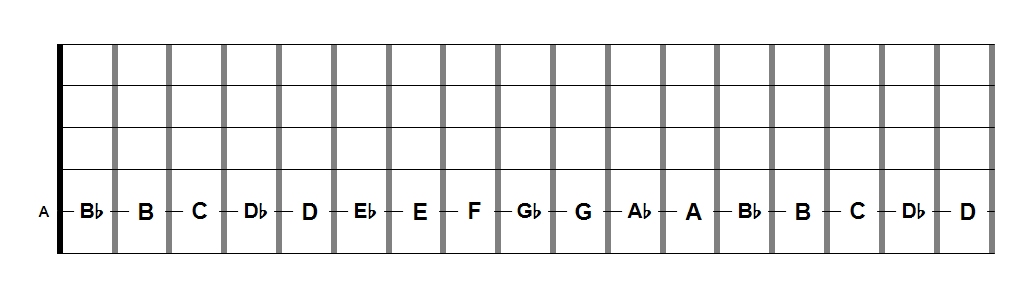
As stated before there are various reasons for calling the enharmonic notes by ether their sharp names or their flat names. The most basic reason is to avoid mixing sharp names with flat names whenever possible. So, for our purposes, when you’re naming the notes in ascending order use the sharp names, and when you’re naming the notes in descending order use the flat names.
Ascending:
A – A♯ – B – C – C♯ – D – D♯ – E – F – F♯ – G – G♯ – A
Descending:
A – A♭– G – G♭ – F – E – E♭ – D – D♭ – C – B – B♭ – A
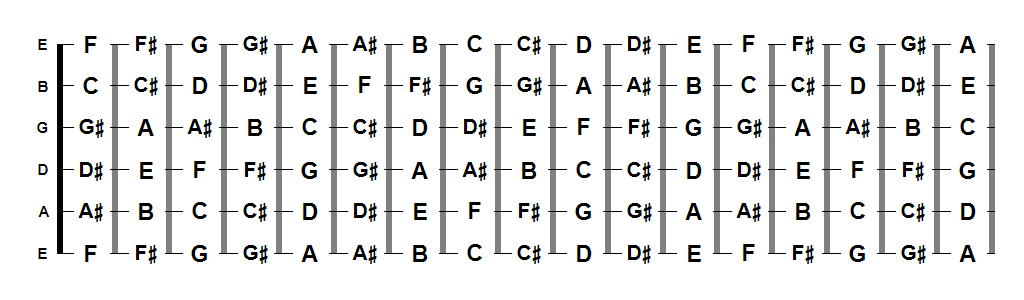
If we fill in the notes on the remaining strings it looks like this:
If we take out the sharps and leave just the natural notes it’s a little easier on the eyes and easier to begin learning:
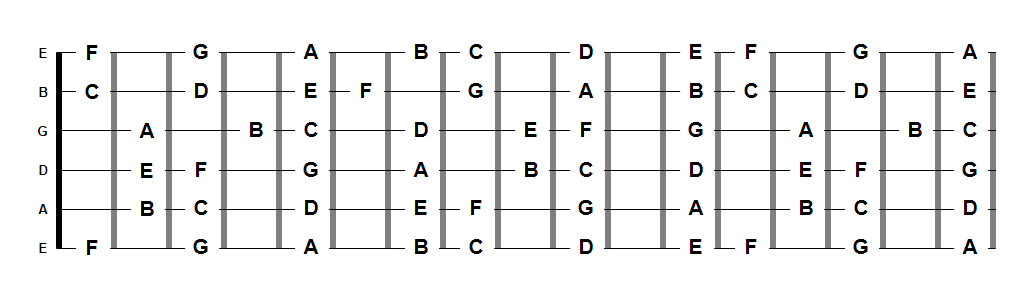
The first thing to learn is the pitches of the open strings. Open string means playing the string without pressing the string to the fingerboard. Each string takes it’s name from the open pitch. You’ll encounter players referring to the D-String, the B-string, the Low E-String, etc. The small letters to the left in the diagrams above represent the open string pitches.
A handy mnemonic for memorizing the open string pitches goes like this:
Elephants And Donkeys have Great Big Ears
Once you have the open strings down we can use that knowledge to unravel the note locations over the rest of the fingerboard. Remember our old friend the octave? The notes at the 12th fret are octaves of the open strings, so they get the same note names:
Scroll back up and take a look at the previous diagrams with all the notes filled in. Notice that everything on the first fret repeats at the 13th fret. Everything on the 2nd fret repeats at the 14th fret, etc. If you were to learn all the natural notes on frets 1 through 5, you’d also know the notes on frets 13 through 17. That’s pretty handy.
Another way the 12th fret helps you is by giving you a second point of reference. Say you want to know what note is at the 3rd fret of the A-string. Simply start with the open string pitch and work your way one-note-at-time up to the third fret:
A – A♯ – B – C
But what if the note is at the 9th fret instead? It would be easier to work your way down from the 12th fret:
A – A♭– G – G♭
The notes on both E-strings are Identical. The high sounding string (closest to the floor when holding the guitar and the top string in the diagrams) is called the high E-string and the other is called the low E-string: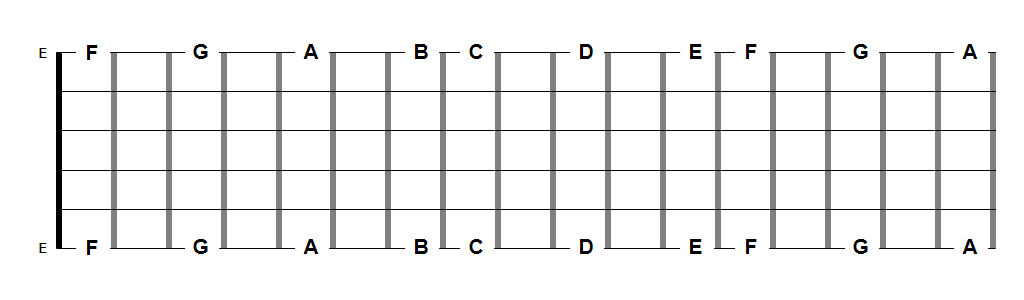
Now take a look at the notes across the 5th fret:
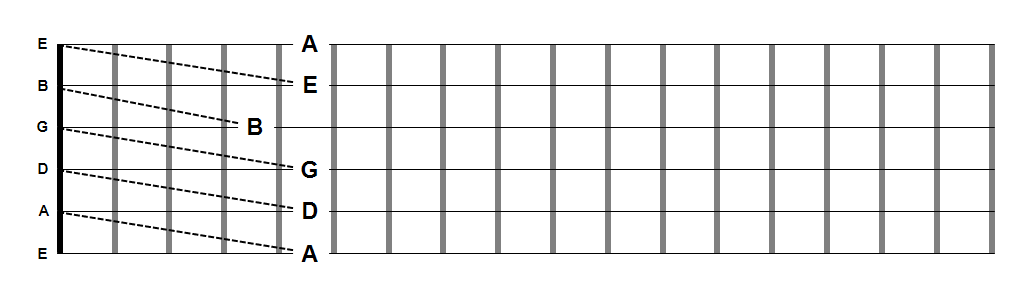
The pitch at the 5th fret of the low E-string (A) is the same pitch as the open A-String. The pitch at the 5th fret of the A-string (D) is the same pitch as the open D-string. The pitch at the 5th fret of the D-string (G) is the same pitch as the open G-string. But on the G-string it’s the pitch at the 4th fret that matches the open B-string. This is very important. It has a significant impact on how certain note relationships line up on the highest two strings compared with the lower 4 strings. This will become clear once we look at octaves.
On the B-string, once again, you’ll find the pitch at the 5th fret matches the pitch of the open high E-string.,
Once again, let’s return to our old friend the octave:
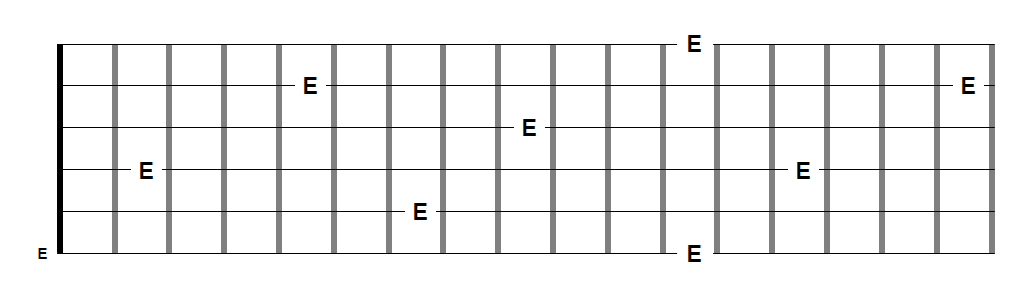
Take a look at the open low E-string. Notice that you have the same pitch at the 2nd fret two strings over. Remember this pattern – two strings over and two frets up.
In a previous diagram we leaned that all the notes repeat at the 12th fret. Notice that the octave of the E at the 12th fret once again sits two strings over and two frets up (14th fret on the D-string).
If you look at the E at the 7th fret on the A-string you’ll see that it’s octave is also two strings over and two frets up.
Now, take a look at the E note at the 2nd fret of the D-string. It’s octave is going to be two strings over and three frets up. Remember how the open B string didn’t match the other strings and the notes at the 5th fret? That discrepancy makes the B string one fret lower in pitch than the bottom four strings. This also makes the high E-string one fret lower in pitch. If everything matched at the 5th fret the two highest strings would be tuned to C and F instead of B and E. This standard tuning makes it easier to play chords, but a little more difficult to know where the notes are sitting. The thing to keep in mind is that when you’re looking for the octave on the top two strings, it’s going to be one fret higher than normal – two strings over and three frets up.
What we’ve learned about octaves on the guitar:
- For any note the octave can be found 12 frets higher (or lower) on the same string
- For any note on the low E-string and the A-string the octave can be found two strings over and two frets up
- For any note on the D-string and G-string the octave can be found two strings over and three frets up.
Another thing to look at is how the notes line up on adjacent strings
Find every E note in the above diagram. Notice how for every E note an A note sits at the same fret one string higher except for the E at the 9th fret of the G string. The A note on the B-string is one fret higher just like with octaves. Anytime you’re dealing with the B-string and high E-string the notes are going to be one fret higher.
Notice how for every E note there is a B note sitting at the same fret one string lower except for the E at the 5th fret of the B-string. Once again you have to account for the tuning difference between those two strings. You’ll see the same thing at the 17th fret of the B-string.
Go back up to the diagram with every note on the fingerboard. Pick any note at random and pay attention to the notes on the strings above and below that note. Find that same note at any location on the fingerboard and you’ll find the neighboring notes sitting there too.
As you work with the notes on the fingerboard use the octaves and adjacent string relationships to help for find your way around. After a while you’ll start seeing these locations without having to think about it.
The Practice
Concentrate on learning the natural notes first. Learn them up and down the individual strings. Learn them across the strings at each fret marker. The flats and sharps will fall into place as you go. You’ll also be learning the C Major Scale which is probably the most important thing to know in music theory.
Open the PDF file, below, and print about 2 billion copies:
Now, every time that you think you don’t have anything to do, grab one of the sheets you just printed out and fill in the names of the notes on each neck diagram. It really doesn’t matter if you write in the notes one string at a time or across the strings or in any other manner you can come up with. Writing those notes out on the diagrams is going to help you to start seeing them. That is the whole point of doing the exercise.
Another good practice is to pick a note per day, and for that day, you practice locating that note on your guitar neck. The next day, pick a different note. This exercise can be extended to include practicing chords, scales, modes, arpeggios (you name it) from your selected note.
A third exercise is for when you don’t have your guitar near you (maybe you are waiting at the bus stop or riding the subway). Pick a chord or a scale or even a lead lick that you know and visualize exactly where you would play it on the guitar neck. Then try to figure out what notes you would be playing. The more clear you are in your mind about what frets and strings you would be playing, the greater the benefit you will receive from this exercise.
Lastly, anytime while playing the guitar that you can remember to do this, stop and ask yourself what notes you are playing. If you don’t know what notes you are playing, figure it out.
There’s no real short-cut to learning to see the notes up and down the fingerboard. It simply takes a desire and willingness to learn and practice. It also helps if you can see a potential value in acquiring the skill.
Best of luck!